
For my stop motion video, I used my Flip Mino, but really any camera capable of taking videos will do the trick. Here is how to make a stop motion video in four easy steps.
Step 1 – Set the “Stage”
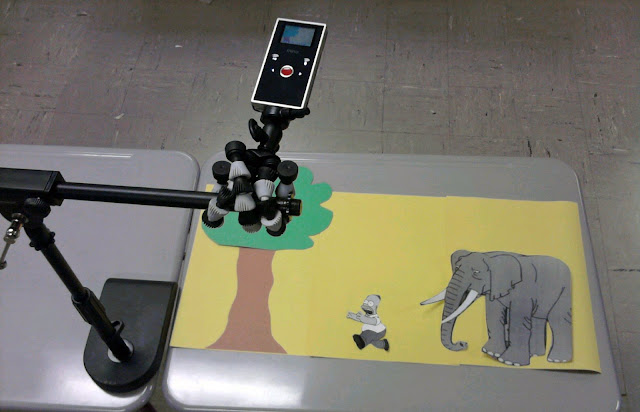
Before filming, decide how the stage will appear. Choose props, characters, word bubbles (if needed), and background scenery for your movie. For my sample above, I used magnets on a dry erase board. I mounted my camera parallel to the board. The below example shows another possible method for setting the stage. I used a desktop microphone stand and a flex grip camera mount to position the Flip directly over the scene. Choose whichever method is going to make filming your scene easiest.
Step 2 – Record your Scene
Back in the early days of stop motion, every frame was photographed individually. This was laborious and often riddled with mistakes – the slightest bump of the camera would create a major discrepancy in the final movie. Today, thanks to digital video, there is an easier way. Instead of taking digital pictures frame by frame, simply press record on your video camera. Now move your characters every so slightly and then remove your hand from the shot. Wait a second and repeat. Pay attention to your shadow – you don’t want it inadvertently finding its way into your finished film!
Step 3 – Create Snapshots from the Raw Footage
Once you have inched your way through the scene, it’s time to create snapshots. This can be done with any video editor, but I found it especially easy using Windows Movie Maker. Simply import the video into the timeline and press play. Stop at any point where you want to create a snapshot, then choose “take picture from preview” from the tools menu. I saved my pictures in sequential order to make it easier to import later. The raw footage for my dinosaur sample was almost 8 minutes long, but after omitting shots I didn’t want I was able to condense it down into about 60 snapshots.

Step 4 – Import Snapshots
After you have your snapshots, you can delete the raw footage from the timeline. Before importing the snapshots, you will have to determine how long you wish each one to display for. Go to options in the tools menu and change the duration to .25 seconds (feel free to experiment with the length of time). Now you can select all of your snapshots and drag them into the Movie Maker project. If there are frames that you want displayed longer than others, you can manually change the length by clicking on the outer edge of the snapshot and dragging it to the desired length. When your stop motion video is complete, save as a movie just like you would any other Windows Movie Maker project!

Save to delicious Saved by
0 users


1 Responses:
Thanks for this step-by-step resource, it's great!
Post a Comment