The conversation of open source software in education came up the other day while I was talking to our school tech integrator. Always happy to further the cause, I burned a copy of the most recent Ubuntu Linux release, and left it on his desk. I figured he would pop it in, see how incredible it is, and resolve to never boot up a Windows machine again. Instead, the next day when I asked him what he thought, he looked at me blankly and said that he didn’t even know what to do with the present I had left for him.
About a year ago, I wrote this post in the hopes of sharing my love of Linux operating systems with other teachers. Notice that exactly zero people commented? Me too.
Maybe I was being too assumptive about comfort level.
Let’s start over. Instead of agreeing to take the red pill and step out of the Windows Matrix forever, will you take a few minutes to just peek into what could be? This is absolutely hassle free – you lose nothing and make no changes to your computer. Here is how to get a glimpse into the world of Linux.
Part I – Download and prepare the operating system
Linux comes in a variety of flavors (just like there are different versions of Windows) with each having specific strengths, advantages, and features. Feel free to explore many of the popular distributions at distrowatch.com, but for this tutorial we’ll be focusing on one of the most popular, Ubuntu.
1. Go to http://www.ubuntu.com/getubuntu and download the most recent release, Ubuntu 10.04. This is a fairly large file so it may take a few minutes depending on your transfer speed.
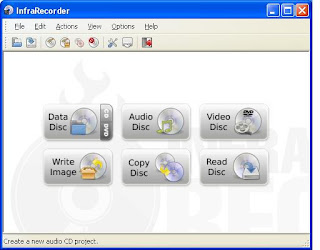
2. In order for the computer to read this as an operating system and not just a folder containing a series of files, you will need to burn it onto a cd/dvd as an image. To do so, you will need a free program called InfraRecorder. Download this and install it.
3. Insert a blank cd/dvd into your burner and then run InfraRecorder. You will see a menu option that says “Write Image.” Click on this. If you are using a dvd, you can then click on the ok button to start burning. If you are using a cd, you will need to first click on the advanced tab at the top and select “allow overburning.”

4. When burning is complete you will have an entire operating system ready to use on a single disc! So far, so good!
Part II – Taking Ubuntu for a test drive
1. The beauty of Ubuntu is that you have the ability to boot and run the operating system from the cd. This means nothing will be saved, changed, or deleted from your computer. Testing out the operating system does nothing to your current computer configuration.
2. Restart your computer. You will need to tell the computer that you want to boot the contents of the cd rather than the operating system that is stored on the hard drive. To do so, you will have to access what is called the boot menu. When your computer first reboots, you probably see a splash screen that shows the brand of the computer (Dell, HP, ect). Somewhere on that screen there is a command that, when pressed, will let you change the boot options. It is usually either the Esc key or one of the function keys (I’m using a Dell right now, and the boot menu is accessed by pressing F12). Whatever key it may be on your computer, press it as soon as the computer restarts. If you see the Windows start up screen, you’re too late. Try it again.

3. Once in the boot menu, select the option the says CD-ROM. This will begin loading the contents of your freshly burned disc.
4. At this point your computer will start to flash commands that are reminiscent of The Matrix, however there is no need to be alarmed. Just sit tight and enjoy the show. When the start screen appears, choose Try Ubuntu 10.04 LTS. Do not choose the install option unless you want to permanently change the contents of your hard drive. Choosing the Try option will run Ubuntu off of the cd.

A Quick Note: You may notice that your computer may appear to be running slowly. This is not a fault of Ubuntu – in fact I actually find it to be as fast if not faster than Windows XP; however you need to keep in mind that you are demoing an operating system from a cd/dvd.
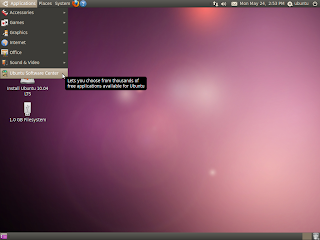
5. It’s time to explore! You will notice that the desktop is similar to that of a PC/Mac so it should be fairly intuitive to navigate. There are plenty of software packages that come pre-installed with Ubuntu – they are located in the Applications menu at the top right.
6. Ubuntu also has a handy feature called the Download Center. Rather than scouring the Internet for applications, the Download Center acts as a database for everything that will run hassle-free in this operating environment. Feel free to “install” anything you’d like. Again, because this is a demo, those applications will not be saved either to the cd or to your hard drive.

Conclusion
Save to delicious Saved by
0 users


1 Responses:
I am always baffled by the reluctance of the people in IT to try out a free operating system. I've had tech support back away from my laptop with their hands in the air when I advised them it was running on linux (ubuntu) - for real!
One of my missions is to demystify ubuntu and open educational resources for the greater education community!
I've started something here, though need to be writing more often. Now that summer vacation is on us I plan on developing it further.
Ubuntu is not scary
Do you feel like writing a little guest post? :)
Post a Comment