Showing posts with label digital media. Show all posts

Friday, May 25, 2012

Using QR Codes to Make an Interactive Yearbook

About a year ago, I wrote a post proclaiming my excitement about QR codes in the classroom. Since that time, the little square anomalies have blown up and now appear pretty much everywhere (last weekend I even spotted one taped to the door of the place where I go to get my hair cut).

My school, too, has made strides in using QR codes. One now appears on our official school letterhead, and one is prominently displayed in the main lobby that links to a supplemental video for our online book clubs. Most notably, however, is the sudden appearance of them in this year's student yearbook.

I have worked with our art teacher and yearbook coordinator to include embedded videos in QR code form that correspond with the events that are memorialized on the pages of the yearbook. It's a way to make the yearbook a more accurate snapshot of what life was like throughout the year.

Our efforts did not go unnoticed. Local news channel, WIVB, heard about our yearbooks and did a quick segment on our use of technology to connect the physical and digital worlds. You can read their news story here or watch the story below.


Save to delicious Saved by 0 users
Digg Technorati StumbleUpon Reddit BlinkList Furl Mixx Facebook Google Bookmark Yahoo
ma.gnolia squidoo newsvine live netscape tailrank mister-wong blogmarks slashdot spurl

Friday, September 24, 2010

10 New Web 2.0 Tools for Teachers

I spent today scouring Delicious and Twitter for new Web 2.0 tools that I can use this year in my classroom. Some of these services aren't new in the sense that they are recent startups, but they're new to me, so I don't consider the title of this post incorrect! I hope you find these useful!


GoAnimate
This tool creates multi-scene, animated cartoons. This is probably the most difficult resource on this list to learn, but it also yields the most impressive results. The quality and style of the cartoons remind me of Family Guy (which is either a praise for GoAnimate, or a slam to Family Guy!).


Issuu
Issuu isn’t a new tool, but it’s just so cool that I had to include it on the list. Issuu allows users to upload .doc and .pdf files and creates flashy online books. This service practically begs to be used to make end-of-the-year portfolios with students.

Sqworl
In addition to having the coolest name among the Web 2.0 tools on this list, Sqworl is a web application that creates one page to bookmark multiple URLs. Users of Opera or Google Chrome web browsers will notice that Sqworl pages look just like their home pages. It’s a great way to share multiple links with students – excellent for webquests, research, etc.

ZooBurst
I wrote a post about this service last week. ZooBurst creates online, interactive 3-D pop-up books. It also takes advantage of computers equipped with webcams and allows the “book” to be viewed in augmented reality, which needless to say, is really, really cool.

NumberQuotes
NumberQuotes puts large numbers into perspective by comparing it to something more tangable. For example, the Antoine Dodson Internet meme has more than 25 million views. If each view were a penny, the pile of pennies would weigh as much as 9 African elephants. How did I know that? NumberQuotes told me.

Ahead
Ahead is a tool similar to Prezi, but with a much tighter, spatially-friendly presentation. I’ve used Prezi in class before, and although it is a dynamic presentation tool, I’ve found that students have a difficult time following connections between each movement. If you’ve noticed this too, I would recommend giving Ahead a try!


TypeWith.Me
Last year, I wrote about using the collaborative workspace called Etherpad with students. Since then, Google has acquired the service and released the source code to the world. TypeWith.Me is more-or-less Etherpad under a new moniker.


PhotoPeach
This online slideshow/photo sharing application is similar to Animoto, but with a few added features. PhotoPeach allows for text overlays, and viewers can even leave comments that will appear in the closing credits of the slideshow. In my opinion, Animoto doesn’t fit under the umbrella of Web 2.0 because it is a one way street. PhotoPeach, on the other hand, provides a way for the viewer to interact with the project rather than just be a static observer.

Pixton
Pixton creates colorful and professional online comic strips. Users can choose from a library of clip art, or they can create their own. Pixton is free for personal use, and approximately a $1 per month per user for an education account.

ToonDoo
ToonDoo is a sub-project of online office suite powerhouse, Zoho. ToonDoo’s about us page says it was designed as “a new way of expression for those who do not have the talent to draw,” and the result is a simple comic strip generator that relies primarily on simple cartoon-style clip art. It doesn’t look as fancy as Pixton, but it is far easier to use.

Save to delicious Saved by 0 users
Digg Technorati StumbleUpon Reddit BlinkList Furl Mixx Facebook Google Bookmark Yahoo
ma.gnolia squidoo newsvine live netscape tailrank mister-wong blogmarks slashdot spurl

Monday, May 10, 2010

How to Make Stop Motion Movies in 4 Easy Steps

Despite stop motion video reaching its peak in the long-forgotten era of Gumby and Davey and Goliath, it is a film technique that is simple and powerful. It is very cheap to produce and requires creativity and problem solving skills – all excellent reasons to use it in class with students!

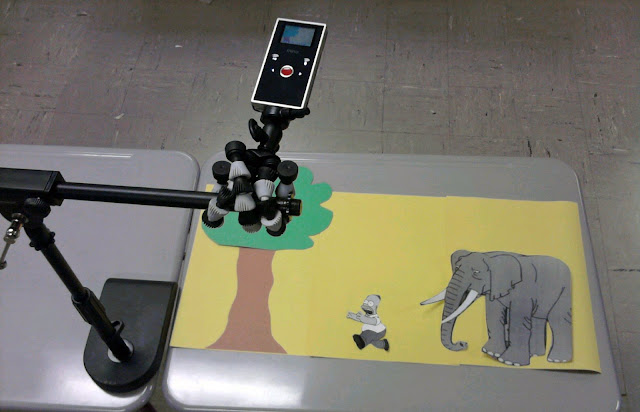
For my stop motion video, I used my Flip Mino, but really any camera capable of taking videos will do the trick. Here is how to make a stop motion video in four easy steps.


Step 1 – Set the “Stage”

Before filming, decide how the stage will appear. Choose props, characters, word bubbles (if needed), and background scenery for your movie. For my sample above, I used magnets on a dry erase board. I mounted my camera parallel to the board. The below example shows another possible method for setting the stage. I used a desktop microphone stand and a flex grip camera mount to position the Flip directly over the scene. Choose whichever method is going to make filming your scene easiest.


Step 2 – Record your Scene

Back in the early days of stop motion, every frame was photographed individually. This was laborious and often riddled with mistakes – the slightest bump of the camera would create a major discrepancy in the final movie. Today, thanks to digital video, there is an easier way. Instead of taking digital pictures frame by frame, simply press record on your video camera. Now move your characters every so slightly and then remove your hand from the shot. Wait a second and repeat. Pay attention to your shadow – you don’t want it inadvertently finding its way into your finished film!

Step 3 – Create Snapshots from the Raw Footage

Once you have inched your way through the scene, it’s time to create snapshots. This can be done with any video editor, but I found it especially easy using Windows Movie Maker. Simply import the video into the timeline and press play. Stop at any point where you want to create a snapshot, then choose “take picture from preview” from the tools menu. I saved my pictures in sequential order to make it easier to import later. The raw footage for my dinosaur sample was almost 8 minutes long, but after omitting shots I didn’t want I was able to condense it down into about 60 snapshots.


Step 4 – Import Snapshots

After you have your snapshots, you can delete the raw footage from the timeline. Before importing the snapshots, you will have to determine how long you wish each one to display for. Go to options in the tools menu and change the duration to .25 seconds (feel free to experiment with the length of time). Now you can select all of your snapshots and drag them into the Movie Maker project. If there are frames that you want displayed longer than others, you can manually change the length by clicking on the outer edge of the snapshot and dragging it to the desired length. When your stop motion video is complete, save as a movie just like you would any other Windows Movie Maker project!


Save to delicious Saved by 0 users
Digg Technorati StumbleUpon Reddit BlinkList Furl Mixx Facebook Google Bookmark Yahoo
ma.gnolia squidoo newsvine live netscape tailrank mister-wong blogmarks slashdot spurl

Wednesday, October 28, 2009

Modeling How to Use the Flip Camera with Students

Every day, my team begins our daily meeting by entering homework into the team calendar on our school website. It's a nice way to communicate to parents, and also serves as a way to hold kids accountable when they are absent. Understandably so, it's not the most popular page on the website. Based on a quick poll in class, I'd guess less than a third of our kids frequent it more than once a week.

I'm trying to change that. For the past week, I've been taking the last 10 minutes of my silent reading group and filming skits with them that go along with the day's homework. It's giving me practice with my new Flip camera (yesterday's post explained how I got it), and since I upload the finished movie directly into the calendar, I'm assuming more kids are visiting it from home.

Right now the skits are more about the message than the process. I'm the one who writes up the dialogue, and the one who records and edits the video. But I'm hoping by modeling this process on a daily basis, students will soon be able to take over the task. Actually, that's already happening. Today, several students knocked on my door to ask if they could borrow the Flip for a Social Studies project.

Those kids probably aren't going to check the homework tonight, but I can guarantee they wouldn't have thought of adding a technology piece to their project if they hadn't seen how it was done first.

Here are our video skits for the last two days. I hope you enjoy!


Save to delicious Saved by 0 users
Digg Technorati StumbleUpon Reddit BlinkList Furl Mixx Facebook Google Bookmark Yahoo
ma.gnolia squidoo newsvine live netscape tailrank mister-wong blogmarks slashdot spurl

Tuesday, October 27, 2009

4 Ways Flip Cameras are Better than Digital Video Cameras


Last week I was chosen to be a participant in a 2-year study on using a Flip Mino video camera in the classroom. Admittedly, I know very little about the Flip but I've been using digital video cameras in my classroom for a long time, so I really didn't see the big deal.

Even though my Flip Mino has only been out the box for about a week, I've already noticed some definite advantages to using it versus a traditional digital video camera.


Portability
I'm fortunate to teach in a district that has a healthy technology budget, so digital video cameras have been accessible for years. When a teacher needs to sign one out, they head to a storage cabinet where each camera is stored in it's own insulated lunch sack. Although it's a more economic way of keeping things safe, you can't help feel like a bit of a dork walking down the hall with it. Look at the picture below. Think about taking one of those bags with you on a field trip. You're already holding your own lunch, the first aid kit, a stack of permission slips, student health alerts, and all the other things entrusted to a chaperone. Do you really want to carry a video camera in a lunch box too? The Flip's size is one of its biggest strengths. I could easily carry a dozen of them in one of those sacks (although I'd still feel like a dork).


Transfer
Like most media devices, the Flip camera comes with software to help edit and manage your work. The advantage, however, is that the software is loaded onto the camera and can quickly be installed onto any computer that it plugs in to. No more losing installation CDs minutes after opening the box. You need no accessories, adapters, firewire cables, or attachments. To upload, flip (hence the name) the usb connector out, and plug it in. Done. The Flip is like a portable, traveling movie studio.


Cost
The MSRP for the Flip Mino (which is what I have in my pocket right now) is under $150. The high definition version is under $200. Considering the fact that it was first released just over a year ago, and the effect of Moore's Law on things like this, imagine the capability/cost ratio in a few years.


Ease of Use
There's an on button. And a giant red record button. To give you an idea of how easy it is to use the Flip, here is a video my daughter took. She's two years old. If a two-year-old can do it, so can you.

Save to delicious Saved by 0 users
Digg Technorati StumbleUpon Reddit BlinkList Furl Mixx Facebook Google Bookmark Yahoo
ma.gnolia squidoo newsvine live netscape tailrank mister-wong blogmarks slashdot spurl

Tuesday, March 31, 2009

Banning Books in School is Ridiculous


Let's pretend that after the invention of the light bulb, a decree was made banning the use of candles. After all, light bulbs are safer, more effective, and easier to manage. There would be no need for candles anymore.

But what about the people who couldn't afford electricity? Instead of being illuminated by this new technology, they would instead be cast into darkness. And what about the puppy-love couple looking for a romantic dinner? A softly humming light bulb swaying above the table just wouldn't be the same. And let's not even get into how much of a catastrophe birthday cakes would become.

Banning candles with the advent of the light bulb never happened, because it is a ridiculous idea. No one would possibly want to ban something when it still had so many useful purposes, right?

Then why is there a conversation on Computerworld.com about banning printed books from schools in lieu of ebooks and electronic readers?

Mike Elgan writes:
So that's my proposal: Ban all paper textbooks and go electronic. Students could choose to read on PCs, phones or Kindle-like readers. If students don't have some kind of reader, libraries and computer labs do. (Direct Link)

This is a dangerous idea. Anyone who uses a Kindle or regularly reads ebooks on a computer knows that it's a completely different feel from holding and reading a physical book. If we were to mandate electronic literature, students would have to adapt and I suspect that would bring about the end of independent reading beyond the classroom. If kids don't have access to e-readers at home and fall out of practice reading paper books, then all reading outside of of class is going to end.

I'd rather be enjoying the futility of a candle than be sitting in darkness.
Save to delicious Saved by 0 users
Digg Technorati StumbleUpon Reddit BlinkList Furl Mixx Facebook Google Bookmark Yahoo
ma.gnolia squidoo newsvine live netscape tailrank mister-wong blogmarks slashdot spurl