Showing posts with label technology. Show all posts

Tuesday, June 5, 2012

How do we Fix the Outdated Education Model?

Last August, I had the opportunity to participate in a panel discussion at the #140EDU Conference in New York City. The topic of the discussion was the Alternatives to the Outdated Education Model; the premise of which was that the current education system isn’t broken, but rather completely out of touch with the needs of today’s learners and therefore ineffective. Because of the limited time allowed for the panel, we could only offer general ideals and best practices rather than practical solutions for change. After all, updating the very structure and purpose of education would mean a massive overhaul in a legacy system embedded within U.S. culture – not really something that can be accomplished in a 20 minute panel discussion.

I thought about this experience last night while browsing through a friend’s photo album on Facebook. He’s a bit of a political junkie, which explains why the album was from his trip to the Jimmy Carter Historic Site and Museum located in Plains, Georgia. Among other uber-nerdy shots, one was of a replica of Carter’s sixth grade classroom, circa 1937 under the direction of teacher, Ms. Julia Coleman.

 
 Look past the inkwells, hardwood floors, and dusty chalkboards and you’ll notice something rather profound – the layout is not unlike many of today’s classrooms. Sure, 75 years have brought significant change in technology and ergonomics (I assume those wooden benches were less than comfy), but the essential geography of the classroom has stayed the same. How can we bring about fundamental change when the teacher remains at the head of the class, and students remain isolated in evenly spaced rows?

I know what you’re thinking – My classroom doesn’t look like that! - and you’re probably right. But understand that you are not the norm. To prove my point, I did a quick Google search for “2012 Classroom.” Below is the first classroom picture to come up. Notice any similarities to Carter's childhood stomping grounds?


Much like my brief time as a panelist at #140EDU, I am unable to offer an answer to the problem of our outdated model of education within this meager blog post. Instead, my goal was to use visuals to help better illustrate that despite fancy projectors, cell phones, social networking, etc., we are still doing education wrong. 

How do we fix this?

Save to delicious Saved by 0 users
Digg Technorati StumbleUpon Reddit BlinkList Furl Mixx Facebook Google Bookmark Yahoo
ma.gnolia squidoo newsvine live netscape tailrank mister-wong blogmarks slashdot spurl

Tuesday, October 4, 2011

5 Awesome Things You Can Do With an IPad and an LCD Projector


I've always wanted a document camera in my classroom, so yesterday I made my own - using my iPad. Here's a quick rundown of how to do this:

  • Purchase a VGA Adapter Cable. You can pick one up online for around 20 bucks.
  • Create your iPad stand. For mine, I borrowed a ring stand from the science department and clamped it to a clipboard. It was sturdy and could safely accommodate the weight of my iPad.
  • Use a VGA cable to connect the adapter to the projector. You now have a fully functioning document camera!
Why might someone want to do this, you ask? I've only been experimenting with mine for two days, and I've already stumbled on five mind-blowing uses.

1. Use it as a document camera
Once the iPad is connected to the projector and "mounted" onto the ring stand, the most basic use of this set up is as a document camera. Simply open the camera app and you're ready to go. As an English teacher, this is a natural fit in my classroom. Today, for example, while students worked on rough drafts essays on examples of irony in O. Henry's The Ransom of Red Chief, I circulated the room and occasionally scooped up a paper and slid it under the iPad. It projected nicely onto the screen and I was then able to use these student papers to give suggestions as well as to have the group peer edit. It was far more efficient that having students line up at my desk to individually edit with me.

2. Record demonstrations
Switch the camera app to video mode, hit record, and you now have a work area capable of recording demonstrations and voice narration. This is an effortless way for teachers to kill two birds with one stone- while providing instruction in class, they are simultaneously creating a video "study guide" that can be posted on the class website or blog for students to review.

3. Real-time Kahn Academy
If you're not familiar with the wildly popular Khan Academy videos, click here to see what you've been missing. If you're already aware of the instructional potential behind the Flipped Classroom concept, then give it a try using your iPad. Similar to recording demonstrations, apps like Show Me and ScreenChomp allow the user to create a video that captures finger strokes as well as voice narration. Again, these videos can be recorded live in class and then used later as asynchronous review for students.

4. Hands-on mind mapping
I've always considered mind mapping to be a natural fit for tablet devices because brainstorming tends to work best when ideas can be easily manipulated, moved, and reorganized. Apps like Popplet and MindMash are great for doing just that, and the addition of a projector makes it possible for mind mapping on the iPad to become a group process rather than an individual or small group task.

5. Annotating Student Work
Let's take a closer look at using the iPad as a document camera. In addition to simply viewing student work, the iPad can also very easily snap pictures. From there, teachers can quickly load that image into an app like Doodle Buddy or Show Me to create an environment where the work can be easily annotated, highlighted, or otherwise marked up by either the teacher or other participating students.

I'm sure I'm missing all kind of fantastic ideas. What are your thoughts?

Save to delicious Saved by 0 users
Digg Technorati StumbleUpon Reddit BlinkList Furl Mixx Facebook Google Bookmark Yahoo
ma.gnolia squidoo newsvine live netscape tailrank mister-wong blogmarks slashdot spurl

Wednesday, August 17, 2011

Ed Tech Day 2011

In 2009, I participated in Ed Tech Day, an annual charity event in Western New York that aims to put technology into classrooms. I wrote this blog post about my experience and concluded it by urging others to take part in future Ed Tech Days. Two years later, and I finally got around to taking my own advice.

This year's Ed Tech Day took place on August 16th and installed more than 110 repurposed computers in 12 locations throughout Western New York. I helped set up a training lab and several workstations at GoodWill Industries. The equipment will be used by staff members and community members as they prepare for employment. Their need for this technology and the gratitude we received on site made it well worth the day spent plugging in cables and running system updates, and Goodwill's Director of Human Services, Dan Colpoys even bought us donuts and pizza - a much appreciated gesture!

Below is a slideshow of pictures that document the day's activities, and you can also re-live some of the event through the #edtechday hashtag. For more information on the fantastic events hosted by The Educational Technology Foundation of WNY, visit their website. And while you're there, sign up for next year's Ed Tech Day. I'll see you there!


Save to delicious Saved by 0 users
Digg Technorati StumbleUpon Reddit BlinkList Furl Mixx Facebook Google Bookmark Yahoo
ma.gnolia squidoo newsvine live netscape tailrank mister-wong blogmarks slashdot spurl

Thursday, June 2, 2011

10 Ways to Use QR Codes in the Classroom

QR codes are 2 dimensional computer-generated codes that can be scanned and read by mobile devices or webcams. The first time a colleague showed me QR codes, I was literally giddy with excitement. I immediately recognized the potential for QR codes in my classroom.

Creating the QR code is surprisingly easy. I use QRstuff.com - simply type in the text or url of whatever content you want the code to direct toward, and you're good to go. It's literally that easy. From there, the QR code can be downloaded, added to worksheets, emailed, etc. It can even be scanned directly from an LCD projector or computer screen!

Here are my top ten ways to use QR codes in the classroom.


1. Add a QR code to school letterhead that points to the school website.

2. Use an interactive whiteboard to record notes/math equations/brainstorming/etc. Host the video online and add a QR code to a homework assignment so students can be retaught from home.

3. Hide the answers to a study guide behind a QR code. Copy the code onto the study guide so students can check their answers.

4. Have students write children's books and then record them reading their work. Upload the audio online and add a QR code linking to the audio for each page of the book to create an interactive reading experience.

5. For open house/parent night, have each teacher in the building create a brief video introducing him/herself. Upload the videos and create QR codes that they can hang on their doors. This way parents can take a self tour of the building and get a feel for the quality teachers working in the building.

6. Have students record book reviews and attach the QR code to the inside cover of the book.

7. Create a survey using Google Forms. Print multiple codes (one for each choice in the survey) and then use it to poll the class in anonymous surveys. You'll be able to see immediately how many times a particular code was scanned.

8. Print QR codes that point to your classroom homework/events calendar. Have students attach them to their agendas or daily planners .

9. Create QR codes that link to supplemental materials and add them to the teacher edition of textbooks. This way valuable resources don't get lost in endless network folders on a forgotten flash drive.

10. During a field trip, give students a handout with multiple QR codes that provide supplemental information coinciding with different locations on the trip. Students will have a guided tour even if they are not with the teacher.

Bonus - 11. QR codes are a great way to play pranks (see below, if you dare).


Save to delicious Saved by 0 users
Digg Technorati StumbleUpon Reddit BlinkList Furl Mixx Facebook Google Bookmark Yahoo
ma.gnolia squidoo newsvine live netscape tailrank mister-wong blogmarks slashdot spurl

Monday, May 2, 2011

10 Free iPad2 Apps for Teachers


My wife is the best.


For our fifth wedding anniversary, she surprised me with a new iPad2. The first thing I did was search the app store for as many free apps as I could find. With the dual cameras and 3G capabilities, the educational possibilities have greatly expanded since the premiere of the original iPad.

Here is my list of top apps for the classroom.


AppStart

AppStart is basically a static list of promoted apps for the iPad2. It was the first app I stumbled across while looking for new and exciting things to download, so I figured it warranted heading off this list. The layout is beautiful and it contains some good information. My suggestion – download it, glean as much as you can, and then remove it.


Dragon Dictation

This simple app features a single red record button in the middle and allows anyone to record their voice using the built-in microphone. This has a natural fit in the classroom as assistive technology but can also be used so students can practice their oral fluency expression and speaking skills. Dragon dictation is surprisingly accurate and this makes it a useful tool in the classroom.


Photo Mess

This collage app makes it easy to resize, re-orientate, and manipulate images taken from either of the iPad’s two cameras. This is a great way to make expressive collages on the fly – both as a student project or as an assessment tool.


Photoshop Express

This is the free equivalent to the online Photoshop Express and is especially useful in conjuction with other apps (such as Photo Mess). While it is lacking some of the more spectacular features of the full Photoshop software, it is still an excellent tool for cropping and other basic editing on the iPad.


Junaio

This app uses geo-location to tag a specific location with either text, picture, or 3-D model. At first glance this may appear to be too intricate to be used in the classroom (especially one in a middle school such as mine). But this is not the case. I wouldn't expect students to use this app, but not because it is too difficult. Instead, teachers could use this app for outdoor activities and field trips. I teacher could go to the location ahead of time and place markers. Then, on the date of the trip, students could take the iPad2 to add use it to view the markers and get additional virtual information about the physical location that they are seeing. With Junaio, every outing becomes a potential virtual field trip.


Splice

Capturing video is not very useful without a way to edit and polish it. Despite the iPad2’s dual cameras it does not come loaded with any video editing software. Slice is just that. It doesn't have a lot of special features, but it does the basic editing that most people typically need. This is useful in the classroom to create quick student videos, video assessments, or even on the go vodcasts.


Wikipanion

It's surprising how many companies have not yet created official iPad apps (Facebook, for example). Wikipedia is also one of these offenders. Luckily, Wikipanion is an excellent substitute. In fact, it has features that the native iPhone Wikipedia app should probably consider adding in future versions.


Tour Wrist

Here is another app that makes for an excellent digital field trip. This one, however, uses free recorded 3D Panoramic images and the iPad2’s built in accelerometer to turn the iPad into a pair of binoculars (for lack of a better analogy). There are tours for buildings, museums, airship hangers, etc. An additional app is in the works to allow 3rd parties to add to the available tours on Tour Wrist as well. This is something to check back on!


Confer Lite

This app allows a teacher to add a classroom list of students and then track and monitor individual progress by lesson/activity. It is not a gradebook; instead it allows the teacher to qualify (rather than quantify) students’ learning behaviors. It’s an amazing app, but I don’t think it would work in a regular classroom. This app is probably best geared toward small group instruction situations.


Photosynth

Photosynth is actually an iPhone app, but it still works great on the iPad2. This handy apps creates panoramic images almost instantly. Last fall, I wrote this tutorial on how to do something similar using a digital camera. Using this method, it takes about 30 minutes to create a panoramic image. Using Photosynth, it takes about 30 seconds.


Save to delicious Saved by 0 users
Digg Technorati StumbleUpon Reddit BlinkList Furl Mixx Facebook Google Bookmark Yahoo
ma.gnolia squidoo newsvine live netscape tailrank mister-wong blogmarks slashdot spurl

Tuesday, December 21, 2010

How to Create Virtual Realty Field Trips

Field trips are a great idea because it exposes kids to things many of them have never seen before. The probem, however, is that the excitement and novelty often trumps any chance for the true real-world learning and teachable moments that field trips offer. Sure, you can take pictures or videos, but these static media just don't compare.

I was thinking about this and I was reminded of a feature I used to like when my wife and I were house hunting. Some realty sites have an interactive feature where the potential buyer can take a virtual tour through the house. It was a great way to really understand the layout of the house and visualize what it would be like to live there.

Why not use this virtual realty technology for field trips? It's actually fairly simple to do. Imagine taking a field trip to a historic location, for example. The trip can be captured by digital camera and later transformed into a virtual trip that be re-explored in depth from the classroom.

Here is my tutorial for creating a virtual reality tour.


Software Needed:
Auto Stitch
Pano Cube
PT Stitcher
(I have included all of these applications in a .zip folder that can be downloaded here. They can also be downloaded individually from their respective companys' sites.)
Image Editor – Photoshop/Gimp/etc

Equipment Needed:
Digital Camera with plenty of memory
Tripod


Part I: Taking pictures

1. Position the tripod and camera in the approximate center of the location that you plan on capturing. Once you begin taking pictures you cannot move the tripod, so choose carefully.

2. You need to be able to move the head of the tripod in a vertical line from bottom to top but keep it level horizontally, so adjust your tripod as necessary. Do this before you begin taking pictures so it doesn’t interrupt the continuity of the shots.

3. Begin taking pictures by tilting the camera as far down on the tripod as it allows. It’s okay if the tripod legs are in the picture – that’ll be fixed later. Take one picture, then move the camera up so that the new picture will have about 60% overlap. In other words, before moving pick something on the camera screen that is about 40% up from the bottom, and then move the position so that target is now at the bottom of the screen.

4. Continue to take a picture and move the tripod position until your camera is facing straight up (or as close as your tripod will allow). One series of vertical pictures should consist of approximately 10-15 shots depending on the overlap for each picture.

5. Swivel the camera counter-clockwise so there’s about 60% horizontal overlap. Aim the camera all the way down to the ground again and begin a new series of pictures.

6. Repeat steps 3-5 until you have moved 360 degrees around your location. Your final series of pictures should overlap with the first series.


Part II: Create the Panorama

1. Run the AutoStitch program. Select Edit from the menu and then choose Options. You can leave everything as it is, but change the Output size height to 700.

2. Go to Open in the File menu. Select all of your pictures (there should be between 100-150 of them depending on how much they overlap).

3. When AutoStitch finishes, it will create a file called pano.jpg.

4. Use the image editor of your choice (Photoshop or its free equivalent, GIMP) and open pano.jpg. In order to display correctly as a virtual reality tour, pano.jpg must be cropped to be exactly twice as wide as it is high. First, crop out any black areas (these are usually on the outside edges where you may not have tilted the camera enough while taking your pictures) as well as any place where you see the tripod legs. If you’re comfortable with your image editor, these can also be removed using the clone tool. Do not crop the width of the image. If you do so, your virtual reality tour will not be seamless.

5. Make note of the width of your image and then increase the canvas height to half the width. This will put a white space both above and below your image.

6. Using the marquee tool, select and copy a 50-100 pixel strip from your image and copy it. Then stretch it to fill the white space. Do this for above and below the image.

7. Save this edited file as a jpg.

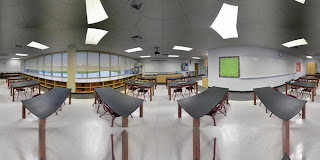
Your image should look something like this. Notice the top and bottom of the image are just slices that have been copied and pasted then stretched to fill the space.


Part III: Turning your panorama into virtual reality

1. Begin by moving the PanoCube folder (named PC00292) directly to your C drive (click on my computer and then C drive). This program is pretty finicky and won’t work if it is in a different location.

2. Open the folder and locate both the PanoCUBE.exe file and the PTStitcher.exe file. Drag the PTStitcher.exe file into the PanoCUBE.exe file. This only has to be done the first time you use the program.

3. Now locate the image file you created with the image editor. Drag this file into the PanoCUBE.exe file. PanoCube will work for a while and then create a .mov file with the same name as the image you dragged into it.

4. You’re done! You can either embed the .mov into a website, or play it from the computer by double clicking it.


Here is a sample tour I created of one of the science labs at my school. (If it doesn't display correcly on your computer as an embedded object, you can download the .mov here).


Save to delicious Saved by 0 users
Digg Technorati StumbleUpon Reddit BlinkList Furl Mixx Facebook Google Bookmark Yahoo
ma.gnolia squidoo newsvine live netscape tailrank mister-wong blogmarks slashdot spurl

Wednesday, May 5, 2010

We Take Technology For Granted


For other typewriter-related posts, click here, or here, or here.


Save to delicious Saved by 0 users
Digg Technorati StumbleUpon Reddit BlinkList Furl Mixx Facebook Google Bookmark Yahoo
ma.gnolia squidoo newsvine live netscape tailrank mister-wong blogmarks slashdot spurl

Tuesday, January 5, 2010

5 Similes

How can teachers use technology in their classrooms when their access to it is so restricted?!

It's like asking a bricklayer to build a house with a $0 brick budget.

It's like criticizing a baker's bland cookies when he has a 1/2 cup sugar ration.

It's like making a race car driver jog the Daytona 500.

It's like auditioning for the philharmonic with a kazoo.

It's like eating spaghetti with chopsticks.
Save to delicious Saved by 0 users
Digg Technorati StumbleUpon Reddit BlinkList Furl Mixx Facebook Google Bookmark Yahoo
ma.gnolia squidoo newsvine live netscape tailrank mister-wong blogmarks slashdot spurl

Wednesday, October 28, 2009

Modeling How to Use the Flip Camera with Students

Every day, my team begins our daily meeting by entering homework into the team calendar on our school website. It's a nice way to communicate to parents, and also serves as a way to hold kids accountable when they are absent. Understandably so, it's not the most popular page on the website. Based on a quick poll in class, I'd guess less than a third of our kids frequent it more than once a week.

I'm trying to change that. For the past week, I've been taking the last 10 minutes of my silent reading group and filming skits with them that go along with the day's homework. It's giving me practice with my new Flip camera (yesterday's post explained how I got it), and since I upload the finished movie directly into the calendar, I'm assuming more kids are visiting it from home.

Right now the skits are more about the message than the process. I'm the one who writes up the dialogue, and the one who records and edits the video. But I'm hoping by modeling this process on a daily basis, students will soon be able to take over the task. Actually, that's already happening. Today, several students knocked on my door to ask if they could borrow the Flip for a Social Studies project.

Those kids probably aren't going to check the homework tonight, but I can guarantee they wouldn't have thought of adding a technology piece to their project if they hadn't seen how it was done first.

Here are our video skits for the last two days. I hope you enjoy!


Save to delicious Saved by 0 users
Digg Technorati StumbleUpon Reddit BlinkList Furl Mixx Facebook Google Bookmark Yahoo
ma.gnolia squidoo newsvine live netscape tailrank mister-wong blogmarks slashdot spurl

Wednesday, October 7, 2009

One-To-One Computing

When it comes to technology in education, we often get caught up in the hype and dazzle of the newest gadget, and as a result we focus on the what and omit the how. It's like buying the fanciest watch without knowing how to tell time.

I was thinking about this Monday night during a meeting for my district's one-to-one computing initiative. Providing a safe and effective environment for more than 3,000 students is certainly an incredible undertaking, so understandably much of our discussion has been on the physical components. What netbook to choose? How will machines be rolled out? What will be protocol for damaged equipment?

The committee is well-managed and is on its way to ironing out the wrinkles in the what end of things. Now for the how.

Training on the actual machines and training on how to incorporate into daily lessons needs to be synchronous. If teachers don't know the capabilities of the hardware then the whole initiative fails. If teachers don't know how to effectively exploit those capabilities then the whole initiative fails. But how do you show one teacher how to foster collaborative work environments, for example, while simultaneously teaching another how to plug in and recharge a laptop battery?

Maybe the question can be summed up as "What should come first - the hardware training or the pedagogy for technology integration?" The answer is yes.

Our building technology integrator made an interesting observation about my habits with technology. He told me that I tend to find something and jump in head first. Completely true. Luckily though, my ratio of perfect swan dives to terrible head injuries is in my favor. And when I do jump in head first only to find the water too shallow, what's the worst that can happen? I pick up the pieces of a shattered lesson, and learn from my mistakes.

On the small scale of my daily lessons this is a risk worth taking, but on the grand scale of a district looking to implement one-to-one computing, we need to be more assertive in addressing the needs of the teachers. Teach the teachers, and one-to-one has the opportunity to become a revolution.
Save to delicious Saved by 0 users
Digg Technorati StumbleUpon Reddit BlinkList Furl Mixx Facebook Google Bookmark Yahoo
ma.gnolia squidoo newsvine live netscape tailrank mister-wong blogmarks slashdot spurl

Thursday, August 20, 2009

Ed Tech Day 2009

I don't normally pay much attention to commericals, however about a month ago one caught my eye. It was for something called Ed Tech Day, and judging by it's straight-forward message and simple production quality, I assumed it was something local.

Edtechday.org explains that the event is sponsored by the Educational Technology Foundation of WNY, and is designed to "help educators and community volunteers enrich the lives of children by improving access to modern computer technology. " Basically, a bunch of tech nerds get to wander around technology-starved schools piecing together a variety of donated technologies. I spend much of my free time doing this in the basement with no real purpose or cause, so Ed Tech Day was right up my alley.

Ed Tech Day was this past Tuesday, the 18th. My assignment was Northern Chautauqua Catholic School in Dunkirk. The worse part of the event was the hour and a half drive from my house for the 8am start, but I got to meet some cool folks and picked up a few new tech tricks as well, so the bleary-eyed drive was worth it.

Of the 8 of us volunteering, I was the only one without a professional IT background, but I was still comfortable doing most of the day's chores. It was mostly cleaning up exisiting computers - virus scans, defragging, Windows updates, etc - although I also had the pleasure of unboxing and configuring a brand new Promethean Board. Again, nothing too difficult, so anyone reading this should consider volunteering next year.

The part I'm amazed at is the complete lack of local awareness for such an incredible cause. After seeing the commerical, I sent a tweet out asking if any of my fellow WNYers knew of the event, and didn't receive a single response. Regardless, Ed Tech Day seems to be growing in scope and scale. Here's a portion of a follow-up email I received from foundation president, Elizabeth Schanbacher:

The Educational Technology Foundation of WNY would like to thank all of you who braved the heat today to upgrade 18 sites in three different counties for
the 6th annual Ed Tech Day. Over 120 people volunteered to install 7 servers,
deploy 80 computers, install and upgrade 10 wireless networks as well as
complete a myriad of other tasks to ensure access and equity of technology for our community.

I'm proud to have been one of those 120 people, and I'm looking forward to
doing it again next year. Who's with me?
Save to delicious Saved by 0 users
Digg Technorati StumbleUpon Reddit BlinkList Furl Mixx Facebook Google Bookmark Yahoo
ma.gnolia squidoo newsvine live netscape tailrank mister-wong blogmarks slashdot spurl

Tuesday, May 12, 2009

Don't Ban Guns in School!

There seems to be a lot of “negative publicity” lately as to the allowance of weapons in schools. Admittedly, they can sometimes cause harm, whether purposely or by accident, and can also be used with ill-intent. But I am progressive, and have the ability to see beyond these minor inconveniences.

-------------------------------------------------------------------------------

Guns can be used to enhance curriculum. Wouldn't your lesson on Civil War combat be even better if students could take turns firing a time-period replica Gatling gun? Or how about a re-enactment of the Valentine's Day Massacre (students would shoot blanks at each other, of course)?

Guns empower students. Some of their biggest heroes (Rambo, Davy Crockett, or Walker: Texas Ranger, for example) are often seen toting guns, so this connection will help insecure students feel like part of a group.

Guns are part of the real world! Students in rural and urban areas alike will probably come into contact with guns at some point after graduation. Your school mission statement undoubtedly states that your goal is to prepare students for the real world. Let's face it – guns are here to stay. Instead of ignore them, let's teach kids how to use them effectively!

-------------------------------------------------------------------------------

Are you shaking your fists at me yet? Are you calling for my teaching certificate to be burned?

Before you gather your friends and arm yourself with pitchforks, realise that I was being a bit satirical. Even though guns may have some good, they are clearly not meant for school use.

Did you notice that all the same arguments have been made for using cell phones in schools? Now you tell me – is cell phone use in school a good idea?
Save to delicious Saved by 0 users
Digg Technorati StumbleUpon Reddit BlinkList Furl Mixx Facebook Google Bookmark Yahoo
ma.gnolia squidoo newsvine live netscape tailrank mister-wong blogmarks slashdot spurl

Thursday, May 7, 2009

Keeper of the Light

There once was a village located on a small tropical island. Long ago, the village had decided that it needed a lighthouse to protect them from the dangerous seas that surrounded their island. After building the structure, a keeper was called in from the mainland who was said to be knowledgeable on the subject of dispersing light. The villagers didn't like the idea of the lighthouse keeper looming over them from atop his tower, but it seemed like a necessary evil to keep them protected.

At first, the lighthouse keeper did his job well. Whenever a ship approached the island, he quickly shone the light on the approaching vessel. If it was a passenger or cargo ship, the keeper guided it safely to port. There were also rare occasions when a vessel appeared that was of ill intent – a pirate ship, for example. In these cases, the lighthouse keeper turned off the mighty globe and the ship was forced to turn away or risk splintering on the jagged reefs surrounding the island.

One night, the keeper leaned over the railing at the top of the lighthouse and peered down on the village (Incidentally, the villagers hated when the keeper walked the light deck because it cast his long shadow over the entire island, which is a pretty obvious metaphor for oppression). It was late at night, and most of the villagers were sleeping – all but the village scholar who was busy studying a new leather-bound manuscript he had recently received. His window was illuminated from the candles he was using to read by.

The lighthouse keeper was furious. It was his job to keep the island safe, and he felt that this light could spell disaster. What if a pirate ship were to see the light from the scholar's window? He made the decision to force the scholar to extinguish his candles. The next time the merchant ship carrying manuscripts and other scholarly things approached the island, the lighthouse keeper turned off his light, and it crashed into the coral reefs.

The next night the keeper again looked over the railing and spotted a glow coming from a window far below. This time it was the village baker. His oven was glowing from the fire that baked breads and pastries for the villagers.

Again the lighthouse keeper was furious. So from then on, the light was extinguished for any vessel carrying food supplies.

The following night, the lighthouse keeper felt confident that he would be met by darkness when he peered over the railing of his tower. Instead, he again saw a light, like a bright beacon coming from one of the villagers windows. It was the chemist, who was mixing chemicals that caused small explosions and bursts of light.

So his supply of chemicals, too, were sunk to the bottom of the reef at the hand of the keeper.

Each night, the keeper spotted a new light shining from below his tower. And with each one, he vowed to turn away another ship from the island. Soon the island was completely cut off from the outside world.

And it was all because of the lighthouse keeper.
Save to delicious Saved by 0 users
Digg Technorati StumbleUpon Reddit BlinkList Furl Mixx Facebook Google Bookmark Yahoo
ma.gnolia squidoo newsvine live netscape tailrank mister-wong blogmarks slashdot spurl