Showing posts with label video. Show all posts

Saturday, July 7, 2012

Managing Your Online Footprint

On June 16th, I participated in an online conference called PD in your PJs hosted by The State of Tech Podcast. The conference consisted on video streams that were captured live using Google Hangouts recently unveiled On-Air feature. The conference proved to be a great use for Google Hangouts and it also gave me the opportunity to talk with some really cool educators about a subject I feel is generally ignored in today's classrooms.

Despite spending up to 11 hours online each day, students still do not understand that what they do now will affect them forever. The Internet - Google especially - never forgets. It also fails to understand how elapsed time affects search results. This means the kid who adds pictures to his Flickr account showing off his beer pong prowess at his 18th birthday party is the same person 10 years later who has graduated from law school and passed the bar exam with flying colors. The beer pong picture and the picture of the grad standing with a proud mom and dad will appear on the same page of an image search. That's some scary stuff.

Everyone does stupid things as a kid. That's part of growing up. The danger now is that those stupid moments are saved eternally.

Below is the finished State of Tech podcast featuring our presentation on the topic of online identity and managing your online footprint. Enjoy!


Save to delicious Saved by 0 users
Digg Technorati StumbleUpon Reddit BlinkList Furl Mixx Facebook Google Bookmark Yahoo
ma.gnolia squidoo newsvine live netscape tailrank mister-wong blogmarks slashdot spurl

Thursday, May 31, 2012

PD in your PJs Virtual Conference


I'm excited to announce that I have been selected as one of eighteen educators to present at the PD in your PJs Online Conference hosted by The State of Tech podcast on Saturday, June 16th from noon to 5pm EST. The conference will include 28 sessions on topics ranging from Google apps to tablet integration to BYOD deployment. Here's the cool part - the conference is completely free and will stream live for all the world to see. If you would like to watch, simply click on the live stream link on June 16th.

My presentation is titled Managing Your Online Footprint and will focus on the importance of maintaining a positive online identity. Complete presentation details are available here. In addition to watching the presentation, 9 lucky folks can join me in the video chat and contribute to the event. If you're interested, you can sign up here. Act fast - spots are limited!

See you on the 16th!


Save to delicious Saved by 0 users
Digg Technorati StumbleUpon Reddit BlinkList Furl Mixx Facebook Google Bookmark Yahoo
ma.gnolia squidoo newsvine live netscape tailrank mister-wong blogmarks slashdot spurl

Saturday, October 15, 2011

My Split Personality

I'm currently enrolled in an online class in the Educational Leadership program at Niagara University. A few weeks ago, my professor assigned a "personal portfolio" project. It was essentially a getting-to-know-you activity with a 21st century digital twist. The only requirements were that the project share some personal and professional details with the class, and it did so in a way that was creative and entertaining.

Many of my classmates turned to presentation sites like Glogster, Prezi, and Sliderocket. A few went the more traditional (and boring) route and created PowerPoint presentations. I decided to be a bit ambitious. One evening after the kids were tucked in for the night, I cleared some boxes off an old couch in the basement and made a video portfolio.

I wanted to share my professional goals as well as my personal interests in a way that was memorable. For an hour spent in the basement and another hour tinkering on the computer, I'm happy with the result, so I thought I'd share it on here.

Enjoy!

Save to delicious Saved by 0 users
Digg Technorati StumbleUpon Reddit BlinkList Furl Mixx Facebook Google Bookmark Yahoo
ma.gnolia squidoo newsvine live netscape tailrank mister-wong blogmarks slashdot spurl

Friday, July 29, 2011

How to Quickly Create and Share Videos

Next year, my students will walk through my classroom doors holding brand new netbooks as part of my school's 1:1 computing initiative. I am well aware that this is going to be a paradigm shift, so I am already trying to prepare myself for when this happens. As a result, I am quietly collecting resources that I will be able to use when the netbooks enter our building.

Every machine comes equipped with a webcam, and I have been brainstorming how to best use this in the classroom. Tools like Skype are certainly valuable, but a bit difficult to manage with a group of 100+ students. I want something simple that can create and share videos without struggling to upload to 3rd party sites like Youtube, or worrying that large files will cause my inbox to explode.

Mailvu.com seems to be the solution to these problems. Mailvu creates videos that can be shared via a link either copy and pasted from the site, or sent to an email recipient. There is also a free app for iPad, iPhone, or iPod Touch that brings this video production to mobile devices.

Below is a student tutorial I made. Feel free to use with your own students!

How to Create and Send Video Messages
Save to delicious Saved by 0 users
Digg Technorati StumbleUpon Reddit BlinkList Furl Mixx Facebook Google Bookmark Yahoo
ma.gnolia squidoo newsvine live netscape tailrank mister-wong blogmarks slashdot spurl

Tuesday, December 21, 2010

Is there a Movie for this Book? (And other frustrations with film adaptations)

The worst part of reading with students is the inevitable question that is always asked: Is there a movie for this? For ELA teachers, this is equivalent to telling Bobby Flay not to bother with dinner because you would prefer to order a pizza and wings.

Most stories we read in class do have movie adaptations – if they are good enough to dedicate class time reading, they were probably good enough for someone to make into a movie. I don't like showing the movie out of obligation, and the typical movie/book-compare/contrast activity is near worthless in my opinion. To make matters worse, the availability of a movie doesn't necessarily mean its any good. Some movie versions of books are quite awful – take the 1981 made for tv adaptation of Todd Strasser's book The Wave, for example. (After starting the movie, kids actually complained about having to finish it.) But any teacher who admits that a movie exists but refuses to show it will face a potential mutiny in his/her classroom.

So how can teachers use a movie version of a story as a valuable resource rather than a frivolous time-killer?

I was faced with this question several weeks ago after reading Shirley Jackson's classic short story, The Lottery. I was teaching a unit on setting, mood, and tone, and I felt this story would work nicely in exploring how these elements work together. The kids loved the story, but I was not sure how to wrap up the unit. The Lottery film adaptation from the 1960s is dated and kind of slow moving, but my students insisted they see it anyway.

The film version is only about 20 minutes long, and as I watched it with the class I again noticed how drawn out the story was. I realized that it could probably have been boiled down to three minutes of actual substance – and this gave me an idea.

After watching the movie, my class agreed that the movie did not do justice to the story. I told them that the final assignment for The Lottery was to create a music video that accurately portrayed the setting, mood, and tone of the story. They could use any song they'd like that they thought fit those requirements, but they only video footage they were allowed to use were clips taken from the film.

To do this, I found the complete film posted on Youtube. I downloaded it from there using Keepvid and then converted it to a usable format with Format Factory. From there, students used Movie Maker to cut and splice what they considered to be important scenes together to fit with the soundtrack.

The group took to the technical labor of this assignment much quicker than I anticipated. It was also interesting to see the variety of songs they were able to successfully apply to the film. We had everything from Tom Jones to Bob Marley, but they all managed to edit the film in such a way to meet the needs of their songs. I was impressed.

This worked especially well with The Lottery, but I could also see it being an excellent culminating project for other short stories (with bad movie adaptations) – The Tell-Tale Heart, Occurrence at Owl Creek Bridge, maybe even novels like The Outsiders, if broken down by chapter. The beauty is that all of these are available on Youtube, so finding the raw materials your students need is not very difficult.

Obviously, this treads dangerous copyright ground, so you may want to refrain from posting students' finished work. I, however, am not heeding my own warning – here is the sample project I made for my students to use as a reference. I made sure to disclose that I am not the owner of any of the materials – the song is Know Your Enemy by Green Day, and the movie is The Lottery, directed by Larry Yust.


Save to delicious Saved by 0 users
Digg Technorati StumbleUpon Reddit BlinkList Furl Mixx Facebook Google Bookmark Yahoo
ma.gnolia squidoo newsvine live netscape tailrank mister-wong blogmarks slashdot spurl

Monday, May 10, 2010

How to Make Stop Motion Movies in 4 Easy Steps

Despite stop motion video reaching its peak in the long-forgotten era of Gumby and Davey and Goliath, it is a film technique that is simple and powerful. It is very cheap to produce and requires creativity and problem solving skills – all excellent reasons to use it in class with students!

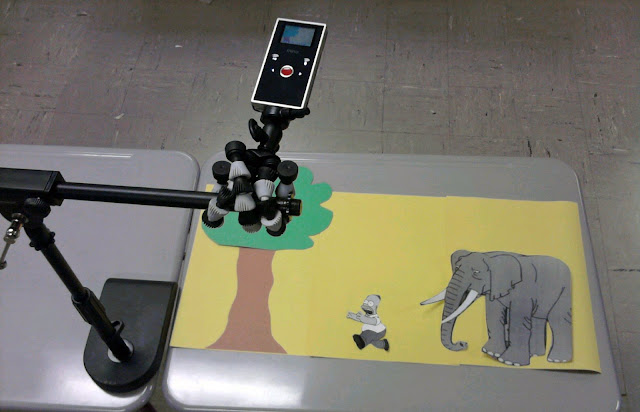
For my stop motion video, I used my Flip Mino, but really any camera capable of taking videos will do the trick. Here is how to make a stop motion video in four easy steps.


Step 1 – Set the “Stage”

Before filming, decide how the stage will appear. Choose props, characters, word bubbles (if needed), and background scenery for your movie. For my sample above, I used magnets on a dry erase board. I mounted my camera parallel to the board. The below example shows another possible method for setting the stage. I used a desktop microphone stand and a flex grip camera mount to position the Flip directly over the scene. Choose whichever method is going to make filming your scene easiest.


Step 2 – Record your Scene

Back in the early days of stop motion, every frame was photographed individually. This was laborious and often riddled with mistakes – the slightest bump of the camera would create a major discrepancy in the final movie. Today, thanks to digital video, there is an easier way. Instead of taking digital pictures frame by frame, simply press record on your video camera. Now move your characters every so slightly and then remove your hand from the shot. Wait a second and repeat. Pay attention to your shadow – you don’t want it inadvertently finding its way into your finished film!

Step 3 – Create Snapshots from the Raw Footage

Once you have inched your way through the scene, it’s time to create snapshots. This can be done with any video editor, but I found it especially easy using Windows Movie Maker. Simply import the video into the timeline and press play. Stop at any point where you want to create a snapshot, then choose “take picture from preview” from the tools menu. I saved my pictures in sequential order to make it easier to import later. The raw footage for my dinosaur sample was almost 8 minutes long, but after omitting shots I didn’t want I was able to condense it down into about 60 snapshots.


Step 4 – Import Snapshots

After you have your snapshots, you can delete the raw footage from the timeline. Before importing the snapshots, you will have to determine how long you wish each one to display for. Go to options in the tools menu and change the duration to .25 seconds (feel free to experiment with the length of time). Now you can select all of your snapshots and drag them into the Movie Maker project. If there are frames that you want displayed longer than others, you can manually change the length by clicking on the outer edge of the snapshot and dragging it to the desired length. When your stop motion video is complete, save as a movie just like you would any other Windows Movie Maker project!


Save to delicious Saved by 0 users
Digg Technorati StumbleUpon Reddit BlinkList Furl Mixx Facebook Google Bookmark Yahoo
ma.gnolia squidoo newsvine live netscape tailrank mister-wong blogmarks slashdot spurl

Sunday, November 22, 2009

10 Useful Chat Sites for Teachers

Several years ago, I used Chatzy.com to conduct an after-reading discussion on Poe's The Raven. I found using a chatroom to be more effective than a traditional verbal conversation. Quiet kids were more willing to participate, and even the kids who were not typing were actively reading the discussion as it unfolded in front of them. Imagine my disappointment late last week when I discovered Chatzy to now be blocked by my school's filtering software.

So the hunt for a new chat service began. The following sites came from Twitter, my Delicious account, and some creative searching on Google. I'm loosely defining them as chat sites, but they cover everything from chatting and back channeling to video chat and microblogging. I made this quick reference chart to give a very general overview of features for each site, and I also wrote a quick blurb about each. Of course, I omitted much, so I leave it to you, reader, to explore these sites to your heart's content. Enjoy!


Stinto.net is a German site. While the chat platform itself is in English, the help, about, and blog pages are not. This means that unless you are bilingual, Stinto does not offer any user support. This is the site I actually chose to replace my beloved Chatzy, and so far it has worked flawlessly with my students.

Tinychat is one of the more popular back channeling sites. Because of this, it is probably the most likely of the sites on this list to be blocked by your school’s filtering software. It has recently integrated a full-functioning video chat feature, which means incredible potential for use in schools, but also incredible potential that one of the rooms featured on the main page of the site will feature something distasteful or obscene.

Todaysmeet does not list the chat participants. This makes it impossible to know if a student is present in the chat but not participating, or if even worse, if an unwanted guest is silently listening in to the conversation. On the plus side, it's possibly one of the most stylish sites on this list. If you want something that looks and behaves "2.0," Todaysmeet is it.

Cover it Live is technically a “live blogging” platform, but I thought I would include it in this list because it allows viewers to submit comments to the moderating user. I could see this working in a more teacher-centered discussion. Cover it Live is designed to be embedded into a website, so this is ideal for use on a class blog or homepage.

Chatzy is ad-supported, but they can be removed and additional features unlocked for a $9 fee. This site also includes a private messaging option which can be turned on and off by the administrator (the person who created the chat).

Etherpad includes a collaborative workspace that is updated in real time for all users to interact with. This is a major advantage, however Etherpad only allows 16 users to be logged in to a pad at a time, which is a deal breaker if you’re working with a large number of students.

Edmodo is education’s answer to Twitter. It includes the same microblogging functionality as well as a few other features such as file sharing and scheduling. It takes some setting up though, so if you’re looking for a chat site that is quick and easy, this isn’t for you.

Tokbox is pretty overwhelming. Video messaging, instant messaging, video conferencing, etc. If you're a teacher looking to integrate long distance learning into your class for no money, this is an excellent avenue to explore.

Chatmaker is a bare bones chat site. It gets the job done, and does it well. The deal breaker for me was the Google-generated text ads. Most of them were suggestive, if not downright inappropriate for students. (Here's a screenshot of what I'm talking about.)

Shout 'em is another site, similar to Edmodo that allows a user to create their own microblogging network. The difference, however, is that Shout 'em can be specifically customized – everything from settings and functionality, all the way to design and color scheme.

Save to delicious Saved by 0 users
Digg Technorati StumbleUpon Reddit BlinkList Furl Mixx Facebook Google Bookmark Yahoo
ma.gnolia squidoo newsvine live netscape tailrank mister-wong blogmarks slashdot spurl

Wednesday, October 28, 2009

Modeling How to Use the Flip Camera with Students

Every day, my team begins our daily meeting by entering homework into the team calendar on our school website. It's a nice way to communicate to parents, and also serves as a way to hold kids accountable when they are absent. Understandably so, it's not the most popular page on the website. Based on a quick poll in class, I'd guess less than a third of our kids frequent it more than once a week.

I'm trying to change that. For the past week, I've been taking the last 10 minutes of my silent reading group and filming skits with them that go along with the day's homework. It's giving me practice with my new Flip camera (yesterday's post explained how I got it), and since I upload the finished movie directly into the calendar, I'm assuming more kids are visiting it from home.

Right now the skits are more about the message than the process. I'm the one who writes up the dialogue, and the one who records and edits the video. But I'm hoping by modeling this process on a daily basis, students will soon be able to take over the task. Actually, that's already happening. Today, several students knocked on my door to ask if they could borrow the Flip for a Social Studies project.

Those kids probably aren't going to check the homework tonight, but I can guarantee they wouldn't have thought of adding a technology piece to their project if they hadn't seen how it was done first.

Here are our video skits for the last two days. I hope you enjoy!


Save to delicious Saved by 0 users
Digg Technorati StumbleUpon Reddit BlinkList Furl Mixx Facebook Google Bookmark Yahoo
ma.gnolia squidoo newsvine live netscape tailrank mister-wong blogmarks slashdot spurl

Tuesday, October 27, 2009

4 Ways Flip Cameras are Better than Digital Video Cameras


Last week I was chosen to be a participant in a 2-year study on using a Flip Mino video camera in the classroom. Admittedly, I know very little about the Flip but I've been using digital video cameras in my classroom for a long time, so I really didn't see the big deal.

Even though my Flip Mino has only been out the box for about a week, I've already noticed some definite advantages to using it versus a traditional digital video camera.


Portability
I'm fortunate to teach in a district that has a healthy technology budget, so digital video cameras have been accessible for years. When a teacher needs to sign one out, they head to a storage cabinet where each camera is stored in it's own insulated lunch sack. Although it's a more economic way of keeping things safe, you can't help feel like a bit of a dork walking down the hall with it. Look at the picture below. Think about taking one of those bags with you on a field trip. You're already holding your own lunch, the first aid kit, a stack of permission slips, student health alerts, and all the other things entrusted to a chaperone. Do you really want to carry a video camera in a lunch box too? The Flip's size is one of its biggest strengths. I could easily carry a dozen of them in one of those sacks (although I'd still feel like a dork).


Transfer
Like most media devices, the Flip camera comes with software to help edit and manage your work. The advantage, however, is that the software is loaded onto the camera and can quickly be installed onto any computer that it plugs in to. No more losing installation CDs minutes after opening the box. You need no accessories, adapters, firewire cables, or attachments. To upload, flip (hence the name) the usb connector out, and plug it in. Done. The Flip is like a portable, traveling movie studio.


Cost
The MSRP for the Flip Mino (which is what I have in my pocket right now) is under $150. The high definition version is under $200. Considering the fact that it was first released just over a year ago, and the effect of Moore's Law on things like this, imagine the capability/cost ratio in a few years.


Ease of Use
There's an on button. And a giant red record button. To give you an idea of how easy it is to use the Flip, here is a video my daughter took. She's two years old. If a two-year-old can do it, so can you.

Save to delicious Saved by 0 users
Digg Technorati StumbleUpon Reddit BlinkList Furl Mixx Facebook Google Bookmark Yahoo
ma.gnolia squidoo newsvine live netscape tailrank mister-wong blogmarks slashdot spurl