Showing posts with label how-to. Show all posts

Tuesday, May 29, 2012

A "Cool" Science Experiment - DIY Air Conditioning

My house is about 60 years old. This means the attic is poorly ventilated, the walls are thin, and what little insulation that may have once existed has probably turned to clumpy wads of structural detritus. The result is that our house is consistently in the mid 80s throughout the summer. My wife and I have discussed central air a few times but there are some other home improvements that are higher priorities. So until I check a few things off my list, I'm stuck sweating it out.

Today I was looking around Instructables (which my sister-in-law accurately describes as "Pinterest for guys") and I spotted this tutorial on how to build a DIY air conditioner using a box fan, copper tubing, and an outdoor fountain pump. It was just too cool not to try. 


Here is the finished project. I zip-tied the copper tubing to the fan and then carefully attached the pump inside the styrofoam cooler. We already had the box fan, so the whole project only cost about $40. 


Before adding ice, I checked the air temperature with the fan on. Yes, that's a meat thermometer. I'm an English teacher, not a scientist. Give me a break. 


Add ice. I remember learning once that salt water has a lower freezing point, so I imagine that experimenting with that could improve the air conditioner's performance.


3.3 degrees cooler after running the pump for about 5 minutes! Ok, maybe that's not a lot, but I'd like to think of it as a starting point. I bet with some tweaks, this baby could hit the 5 degree mark.


Realistically, my homemade contraption would last about 6 minutes in a house with three kids under the age of five, so I'm taking it to school for the final days before summer recess. Not only will my students appreciate the (slightly) cooler classroom, but my DIY air conditioner practically comes with a pre-installed teachable moment about conductors/insulators, air temperature, and freezing point. What a "cool" way to review for the science final exam. 


Save to delicious Saved by 0 users
Digg Technorati StumbleUpon Reddit BlinkList Furl Mixx Facebook Google Bookmark Yahoo
ma.gnolia squidoo newsvine live netscape tailrank mister-wong blogmarks slashdot spurl

Monday, June 20, 2011

Using Edmodo in the Classroom


This year my school decided to implement a summer reading program, and I think it’s a fantastic idea. I’d like to naively assume that all my students read on their own during the summer, but the annual September regression suggests otherwise. The summer reading program is simple – students read two books, one from a list of “required” readings and a second of their choosing. Then, they complete a brief assignment for each book as proof of reading. It’s not a punitive program, so I do think it actually encourages reading outside of school.

My only concern, however, is that once the students leave school for the last time before break, I will have no opportunity to engage them in conversation about what they are reading. So I had an idea.

Several years ago, I discovered the educational social networking site called Edmodo. It functioned similar to Facebook, but had a lot of education-specific features and teacher controls that made it an excellent tool for online discussion and facilitation. At the time, I had no use for it, and the biggest mistake with technology is to use it just for the sake of using it, so I quietly tucked the site into my mental suitcase. But I thought of Edmodo while mulling over ways to promote the new reading club. What if I set up groups for each required book and then used it to facilitate online discussion over the summer? It’s just crazy enough to work.

I’m sure I’ll be posting on this more throughout the summer. It could be a tremendous success or an abysmal failure (although my suspicion is that the project will land somewhere in between), but itll be an interesting experiment in the ways students learn online and how teachers can further extend the school day beyond the agrarian calendar.

Here is the quick how-to I used with my students to get them set up and logged in to Edmodo. Feel free to use it with your own classes.


Edmodo Tutorial
Save to delicious Saved by 0 users
Digg Technorati StumbleUpon Reddit BlinkList Furl Mixx Facebook Google Bookmark Yahoo
ma.gnolia squidoo newsvine live netscape tailrank mister-wong blogmarks slashdot spurl

Tuesday, December 21, 2010

How to Create Virtual Realty Field Trips

Field trips are a great idea because it exposes kids to things many of them have never seen before. The probem, however, is that the excitement and novelty often trumps any chance for the true real-world learning and teachable moments that field trips offer. Sure, you can take pictures or videos, but these static media just don't compare.

I was thinking about this and I was reminded of a feature I used to like when my wife and I were house hunting. Some realty sites have an interactive feature where the potential buyer can take a virtual tour through the house. It was a great way to really understand the layout of the house and visualize what it would be like to live there.

Why not use this virtual realty technology for field trips? It's actually fairly simple to do. Imagine taking a field trip to a historic location, for example. The trip can be captured by digital camera and later transformed into a virtual trip that be re-explored in depth from the classroom.

Here is my tutorial for creating a virtual reality tour.


Software Needed:
Auto Stitch
Pano Cube
PT Stitcher
(I have included all of these applications in a .zip folder that can be downloaded here. They can also be downloaded individually from their respective companys' sites.)
Image Editor – Photoshop/Gimp/etc

Equipment Needed:
Digital Camera with plenty of memory
Tripod


Part I: Taking pictures

1. Position the tripod and camera in the approximate center of the location that you plan on capturing. Once you begin taking pictures you cannot move the tripod, so choose carefully.

2. You need to be able to move the head of the tripod in a vertical line from bottom to top but keep it level horizontally, so adjust your tripod as necessary. Do this before you begin taking pictures so it doesn’t interrupt the continuity of the shots.

3. Begin taking pictures by tilting the camera as far down on the tripod as it allows. It’s okay if the tripod legs are in the picture – that’ll be fixed later. Take one picture, then move the camera up so that the new picture will have about 60% overlap. In other words, before moving pick something on the camera screen that is about 40% up from the bottom, and then move the position so that target is now at the bottom of the screen.

4. Continue to take a picture and move the tripod position until your camera is facing straight up (or as close as your tripod will allow). One series of vertical pictures should consist of approximately 10-15 shots depending on the overlap for each picture.

5. Swivel the camera counter-clockwise so there’s about 60% horizontal overlap. Aim the camera all the way down to the ground again and begin a new series of pictures.

6. Repeat steps 3-5 until you have moved 360 degrees around your location. Your final series of pictures should overlap with the first series.


Part II: Create the Panorama

1. Run the AutoStitch program. Select Edit from the menu and then choose Options. You can leave everything as it is, but change the Output size height to 700.

2. Go to Open in the File menu. Select all of your pictures (there should be between 100-150 of them depending on how much they overlap).

3. When AutoStitch finishes, it will create a file called pano.jpg.

4. Use the image editor of your choice (Photoshop or its free equivalent, GIMP) and open pano.jpg. In order to display correctly as a virtual reality tour, pano.jpg must be cropped to be exactly twice as wide as it is high. First, crop out any black areas (these are usually on the outside edges where you may not have tilted the camera enough while taking your pictures) as well as any place where you see the tripod legs. If you’re comfortable with your image editor, these can also be removed using the clone tool. Do not crop the width of the image. If you do so, your virtual reality tour will not be seamless.

5. Make note of the width of your image and then increase the canvas height to half the width. This will put a white space both above and below your image.

6. Using the marquee tool, select and copy a 50-100 pixel strip from your image and copy it. Then stretch it to fill the white space. Do this for above and below the image.

7. Save this edited file as a jpg.

Your image should look something like this. Notice the top and bottom of the image are just slices that have been copied and pasted then stretched to fill the space.


Part III: Turning your panorama into virtual reality

1. Begin by moving the PanoCube folder (named PC00292) directly to your C drive (click on my computer and then C drive). This program is pretty finicky and won’t work if it is in a different location.

2. Open the folder and locate both the PanoCUBE.exe file and the PTStitcher.exe file. Drag the PTStitcher.exe file into the PanoCUBE.exe file. This only has to be done the first time you use the program.

3. Now locate the image file you created with the image editor. Drag this file into the PanoCUBE.exe file. PanoCube will work for a while and then create a .mov file with the same name as the image you dragged into it.

4. You’re done! You can either embed the .mov into a website, or play it from the computer by double clicking it.


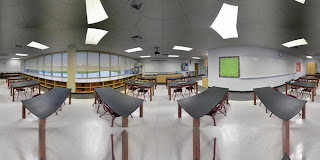
Here is a sample tour I created of one of the science labs at my school. (If it doesn't display correcly on your computer as an embedded object, you can download the .mov here).


Save to delicious Saved by 0 users
Digg Technorati StumbleUpon Reddit BlinkList Furl Mixx Facebook Google Bookmark Yahoo
ma.gnolia squidoo newsvine live netscape tailrank mister-wong blogmarks slashdot spurl

Tuesday, September 21, 2010

Using ZooBurst in the Classroom

It seems like at the start of each school year, there's one new web app that I cannot wait to try with my students. In past years it was Glogster, or Storybird. This year, it's ZooBurst.

ZooBurst creates interactive, 3D pop-up books. In addition to this, it can also be viewed in Augmented Reality mode with the help of a webcam. After printed a special paper from the ZooBurst site, the webcam captures you and "projects" your pop-up book onto the paper you are holding. While this technology is fledgling and not without its major flaws, it is still quite fun to play with, and really lends nicely to the concept of a 3D pop-up book.


Holding my "book" in Augmented Reality

Here is a ZooBurst I made for my team's webpage. I thought this was a much nicer way to provide contact information for parents. The book can be rotated and viewed from different angles by holding down the left mouse button. Clicking on the exclamation points displays the contact info.


I made a tutorial my students when it comes time for them to start their own ZooBursts. Feel free to download and use it in your own classroom!

ZooBurst Tutorial
Save to delicious Saved by 0 users
Digg Technorati StumbleUpon Reddit BlinkList Furl Mixx Facebook Google Bookmark Yahoo
ma.gnolia squidoo newsvine live netscape tailrank mister-wong blogmarks slashdot spurl

Tuesday, May 25, 2010

How to Try Ubuntu Linux for Teachers


The conversation of open source software in education came up the other day while I was talking to our school tech integrator. Always happy to further the cause, I burned a copy of the most recent Ubuntu Linux release, and left it on his desk. I figured he would pop it in, see how incredible it is, and resolve to never boot up a Windows machine again. Instead, the next day when I asked him what he thought, he looked at me blankly and said that he didn’t even know what to do with the present I had left for him.

About a year ago, I wrote this post in the hopes of sharing my love of Linux operating systems with other teachers. Notice that exactly zero people commented? Me too.

Maybe I was being too assumptive about comfort level.

Let’s start over. Instead of agreeing to take the red pill and step out of the Windows Matrix forever, will you take a few minutes to just peek into what could be? This is absolutely hassle free – you lose nothing and make no changes to your computer. Here is how to get a glimpse into the world of Linux.

Part I – Download and prepare the operating system

Linux comes in a variety of flavors (just like there are different versions of Windows) with each having specific strengths, advantages, and features. Feel free to explore many of the popular distributions at distrowatch.com, but for this tutorial we’ll be focusing on one of the most popular, Ubuntu.

1. Go to http://www.ubuntu.com/getubuntu and download the most recent release, Ubuntu 10.04. This is a fairly large file so it may take a few minutes depending on your transfer speed.

2. In order for the computer to read this as an operating system and not just a folder containing a series of files, you will need to burn it onto a cd/dvd as an image. To do so, you will need a free program called InfraRecorder. Download this and install it.

3. Insert a blank cd/dvd into your burner and then run InfraRecorder. You will see a menu option that says “Write Image.” Click on this. If you are using a dvd, you can then click on the ok button to start burning. If you are using a cd, you will need to first click on the advanced tab at the top and select “allow overburning.”
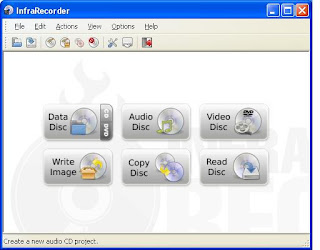

4. When burning is complete you will have an entire operating system ready to use on a single disc! So far, so good!

Part II – Taking Ubuntu for a test drive

1. The beauty of Ubuntu is that you have the ability to boot and run the operating system from the cd. This means nothing will be saved, changed, or deleted from your computer. Testing out the operating system does nothing to your current computer configuration.

2. Restart your computer. You will need to tell the computer that you want to boot the contents of the cd rather than the operating system that is stored on the hard drive. To do so, you will have to access what is called the boot menu. When your computer first reboots, you probably see a splash screen that shows the brand of the computer (Dell, HP, ect). Somewhere on that screen there is a command that, when pressed, will let you change the boot options. It is usually either the Esc key or one of the function keys (I’m using a Dell right now, and the boot menu is accessed by pressing F12). Whatever key it may be on your computer, press it as soon as the computer restarts. If you see the Windows start up screen, you’re too late. Try it again.
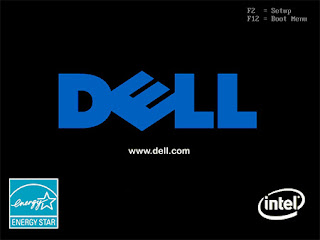

3. Once in the boot menu, select the option the says CD-ROM. This will begin loading the contents of your freshly burned disc.

4. At this point your computer will start to flash commands that are reminiscent of The Matrix, however there is no need to be alarmed. Just sit tight and enjoy the show. When the start screen appears, choose Try Ubuntu 10.04 LTS. Do not choose the install option unless you want to permanently change the contents of your hard drive. Choosing the Try option will run Ubuntu off of the cd.


A Quick Note: You may notice that your computer may appear to be running slowly. This is not a fault of Ubuntu – in fact I actually find it to be as fast if not faster than Windows XP; however you need to keep in mind that you are demoing an operating system from a cd/dvd.

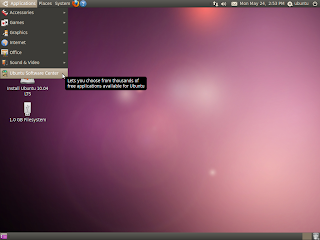
5. It’s time to explore! You will notice that the desktop is similar to that of a PC/Mac so it should be fairly intuitive to navigate. There are plenty of software packages that come pre-installed with Ubuntu – they are located in the Applications menu at the top right.

6. Ubuntu also has a handy feature called the Download Center. Rather than scouring the Internet for applications, the Download Center acts as a database for everything that will run hassle-free in this operating environment. Feel free to “install” anything you’d like. Again, because this is a demo, those applications will not be saved either to the cd or to your hard drive.

Conclusion


The whole purpose of this tutorial is to remove some of the intimidation and mystique behind Linux operating systems. Once the footwork is complete and you have a chance to explore Ubuntu as a user environment, hopefully you’ll realize that it’s not all that different from what you are currently using. Therein lays the advantage – why pay for Windows when you can have Linux for free?


Save to delicious Saved by 0 users
Digg Technorati StumbleUpon Reddit BlinkList Furl Mixx Facebook Google Bookmark Yahoo
ma.gnolia squidoo newsvine live netscape tailrank mister-wong blogmarks slashdot spurl

Thursday, March 25, 2010

Audacity Tip Sheet for Students

Audacity Tip Sheet


Introduction to Podcasting for Teachers
Save to delicious Saved by 0 users
Digg Technorati StumbleUpon Reddit BlinkList Furl Mixx Facebook Google Bookmark Yahoo
ma.gnolia squidoo newsvine live netscape tailrank mister-wong blogmarks slashdot spurl

Monday, November 9, 2009

Using Storybird.com in the classroom


Do you remember that scene in Forest Gump where Lieutenant Dan appears on the dock as Gump sails his shrimping boat through the bay? Forest is so overcome by the excitement of seeing his old war buddy that he jumps overboard to swim to shore, leaving his boat to become a temporary analog of the famous Flying Dutchman ghost ship.

That’s usually how I react to new bits of technology. I don’t look back or anticipate potential problems – I blindly jump in. Sometimes it works, sometimes it doesn’t.

I haven’t decided if using Storybird with my students is going to be a success, or one of my ideas that are prone to devastating failure. Storybird is a free service where users can create (collaboratively, if desired) their own stories using a collection of illustrations provided by the site.

Here’s my idea: We are finishing up a reading of Daniel Keyes’ Flowers for Algernon. The big question that keeps resurfacing throughout the unit is Is is better not to know? The kids seem to understand its meaning in the context of Charlie Gordon, but they’re having a hard time connecting it to their own lives.

I got to thinking – wouldn’t it be cool if they had to write a story that focused on that same essential question? Beginning next week students will begin working on writing a brief tale – a children’s story, perhaps – that centers around a character discovering something he/she perhaps would have been better off not knowing.

The project will get a bit trickier when they realize that Storybird does not allow a user to upload their own images. Students will have to choose a set of illustrations and fashion their story around the images available.

Having two variables – a required theme and a specific set of illustrations – may be too much for them. But I’ve already jumped off the dock with this one, so all there’s left to do is see who sinks and who swims.

Below is a sample story Songbird created to explain their vision as well as the handout I’m planning on using with students to explain how to use the site.


About us: a peek inside Storybird on Storybird


How to Use Storybird.com
Save to delicious Saved by 0 users
Digg Technorati StumbleUpon Reddit BlinkList Furl Mixx Facebook Google Bookmark Yahoo
ma.gnolia squidoo newsvine live netscape tailrank mister-wong blogmarks slashdot spurl

Saturday, July 11, 2009

How to Build a Digital Picture Frame From a Laptop

Last May I assigned a mini research project to my students. The premise was easy – pick a question, then successfully find the answer. I was worried about topics being either too broad or too simple, so I decided to model the research process with my own “burning question.”

I read an Instructable months earlier describing how an old laptop can be converted into a digital picture frame, and that sounded like the kind of idea that would hopefully spark the imaginations of my students. Conveniently enough, I had an old Sony Vaio tucked away in the basement that would serve the purpose nicely. I created the following Sliderocket presentation as the hook to my project. It introduced my example as well as outlined the process for the students' research projects.


It worked. The kids were engaged because they had control over the topic, and my laptop-turned-frame showed them the difference between a thought-provoking, analytical question and a shallow one.

The only problem is that I never got around to actually making the picture frame work. It is actually one of the few regrets I have for the year. I'm tough on the kids about completing work, so why should I be any more lenient on myself?

Well, I can check it off my summer to do list. Two and a half months late, but my digital picture frame is complete. The students I had last year in 7th grade will be the same group I have this coming September as 8th graders, so I look forward to having the frame loaded with last year's school pictures on the first day of school. Better late than never!


For anyone ambitious enough to make their own digital picture frame (and willing to risk trashing an extra laptop), here's my how-to.

Preparing the Operating System:
  1. My laptop originally shipped with Windows 98, but the software I needed to control the frame wouldn't run, so I wiped the hard drive and installed Windows XP.
  2. Rather than install a slide show program, I just used the Windows picture viewer slide show feature. I downloaded this script that allowed me to choose an appropriate length of time for each picture before progressing to the next.
  3. I configured the laptop's network settings so that I could share a folder for pictures. This way, I could add/remove pictures from another computer on my network.
  4. Because I planned to remove the keyboard and mouse, I needed a way to control the screen and start the slide show. To do this, I used TightVNC, a free program that allows other computers to use a VNC client to connect remotely to the laptop picture frame. I added this program to the startup menu so that it would run as soon as the laptop connected to my wireless network.
  5. I restarted the laptop several times after performing these actions to make sure it would do what I expected it to. There would be nothing worse than taking it apart only to find I missed a simple step.

Preparing the Machine:

  1. I started by removing every screw I could find from the case.
  2. The first part to open up was the top of the laptop. I disconnected the pins that held the keyboard into place and this uncovered everything else. It was fairly easy to identify the components, or at least the ones I was certain I wouldn't be needing.
  3. After disconnecting the keyboard, I plugged the laptop in and restarted it. I wanted to make sure it wouldn't do anything funny when I started unplugging hardware. It fired up and shut down without incident, so I continued pulling pieces off.
  4. I only ran into trouble once. After removing the CD drive, touch pad, and LCD casing, I plugged it in to find that it was no longer receiving power. After half convincing myself that I did everything right and that the power supply had somehow shorted out, I retraced my steps by replugging in each device. Apparently the tiny backup battery connected to the internal touch pad component is essential to the laptop's power supply. Problem fixed.
  5. After removing all the unneeded plastic casing and extra hardware, I was left with an LCD screen connected to a motherboard consisting of a wireless card, hard drive, CPU and fan, RAM, and power button.

Assembling the Digital Picture Frame:

  1. 1.My LCD was 9”x12” so I needed to find a frame to fit it. Rather than go to a craft store and get a frame specially ordered, I decided to try my luck at Target. I found this frame that was well-fitted for the project because it was hinged to allow for easy access to the laptop components I was planning on hiding behind the screen.
  2. I attached the LCD to the matting with heavy duty duct tape. It's the down-and-dirty approach, but so far it seems to be working.
  3. After measuring, I realized that the frame would not be deep enough to house the screen and the laptop guts. I pulled off the cardboard backing and cut two pieces of MDF board to fit either side of the frame. After spray painting and attaching these with finishing nails, the frame was now about 1/2” deeper and, because I didn't cut borders for the top or bottom, I now had better air flow through the frame to prevent the laptop from overheating.
  4. I cut a piece of 1/8” backer board to be used for mounting the hardware. A few of the pieces did not have pre-drilled holes, so I taped them down. Then, I nailed it to the back of the frame.

From start to finish my digital picture frame only cost $40. Considering sites like Amazon are selling digital frames half the size for twice as much, I figure the little bit of construction time was well worth it!

Save to delicious Saved by 0 users
Digg Technorati StumbleUpon Reddit BlinkList Furl Mixx Facebook Google Bookmark Yahoo
ma.gnolia squidoo newsvine live netscape tailrank mister-wong blogmarks slashdot spurl

Tuesday, April 28, 2009

How to Use Glogster in the Classroom

One of the first sites I nosed out on Twitter was glogster.com/edu from @pamillamc and @rcurrin. According to the site, Glogster is: A web 2.0 platform that easily allows users to upload photos, videos, text, audio and more to create a unique online, interactive poster. To see its true potential, I decided to give it a go with my group of about 80 7th grade students.

Here's the how-to I used with my kids. The project concludes tomorrow - I'll post some student samples as well as a full review.


Save to delicious Saved by 0 users
Digg Technorati StumbleUpon Reddit BlinkList Furl Mixx Facebook Google Bookmark Yahoo
ma.gnolia squidoo newsvine live netscape tailrank mister-wong blogmarks slashdot spurl